Manager
Overview
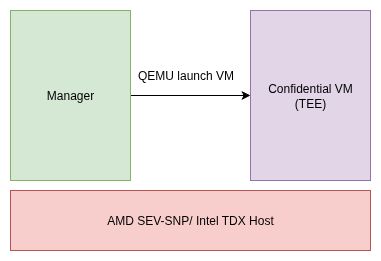
The Manager is a critical component of the Cocos system that runs on TEE-capable hosts (AMD SEV-SNP or Intel TDX) and serves as the orchestrator for Trusted Execution Environment (TEE) deployments. It acts as the bridge between the Computation Management service and the actual TEE instances, providing secure virtualized environments for confidential computing workloads.
Architecture Position
The Manager sits between the Computation Management service and the TEE instances, exposing a gRPC-based API for control operations and maintaining TLS-encrypted connections with upstream services.
Manager Responsibilities
The Manager has two primary operational roles:
1. TEE Deployment and Configuration
- CVM Creation: Upon receiving a create CVM request, the Manager deploys prepared Trusted Execution Environments
- Configuration Management: Uploads necessary configurations including:
- Command-line arguments
- TLS certificates
- Runtime parameters
- Environment variables
- Resource Allocation: Manages CPU, memory, and storage resources for each TEE instance
2. TEE Monitoring and Lifecycle Management
- Health Monitoring: Continuously monitors deployed TEEs for performance and availability
- Logging: Provides remote logs and status updates for observability
- Lifecycle Management: Handles TEE startup, runtime management, and shutdown procedures
- Attestation: Performs vTPM-based attestation and IGVM validation for security assurance
Security Features
vTPM-Based Attestation
- Retrieves cryptographic measurements from the vTPM inside CVMs
- Verifies enclave boot and runtime state integrity
- Ensures operation on trusted hardware without modification
- Provides continuous integrity assurance throughout the CVM lifecycle
IGVM Validation
- Verifies Initial Guest Virtual Machine (IGVM) files by computing expected launch measurements
- Compares measurements with attestation reports
- Ensures CVM initial state aligns with security expectations
- Prevents unauthorized modifications and ensures secure boot
Prerequisites and Setup
System Requirements
Before deploying the Manager, ensure the following components are installed:
Required Software
- Go: Version 1.24 or later (Installation Guide)
- QEMU-KVM: Virtualization platform for running CVMs
- Hardware: AMD SEV-SNP or Intel TDX capable processor
QEMU-KVM Installation
On Debian-based systems:
sudo apt update
sudo apt install qemu-kvm
Hardware Abstraction Layer (HAL) Setup
Download HAL Files
Obtain the required HAL files from the Cocos releases:
# Create necessary directories
mkdir -p cocos/cmd/manager/img cocos/cmd/manager/tmp

# Download HAL components
wget https://github.com/ultravioletrs/cocos/releases/download/v0.6.0/bzImage -P cocos/cmd/manager/img
wget https://github.com/ultravioletrs/cocos/releases/download/v0.6.0/rootfs.cpio.gz -P cocos/cmd/manager/img
Required files:
rootfs.cpio.gz: Initial RAM filesystem (initramfs) for the CVMbzImage: Linux kernel image
OVMF Configuration
The Manager requires Open Virtual Machine Firmware (OVMF) for UEFI support in virtual machines.
Locate OVMF Files
Find OVMF_CODE.fd files:
sudo find / -name OVMF_CODE.fd
Example output:
/usr/share/edk2/x64/OVMF_CODE.fd
/usr/share/OVMF/OVMF_CODE.fd
Find OVMF_VARS.fd files:
sudo find / -name OVMF_VARS.fd
Example output:
/usr/share/edk2/x64/OVMF_VARS.fd
/usr/share/OVMF/OVMF_VARS.fd
Note: OVMF_VARS.fd is copied to a unique temporary location for each VM instance to ensure isolation.
Key Generation
Generate RSA key pairs for secure communication between users and the agent:
# Build CLI tool
cd cocos
make cli

# Generate keys
./build/cocos-cli keys
This creates:
public.pem: Public key for user identificationprivate.pem: Private key for secure communication
Environment Configuration
The Manager's behavior is controlled through environment variables. Below is a comprehensive reference of all configuration options:
Core Configuration
| Variable | Description | Default Value |
|---|---|---|
MANAGER_INSTANCE_ID | Unique identifier for the manager service | (empty) |
MANAGER_GRPC_HOST | gRPC host manager will bind to | localhost |
MANAGER_GRPC_PORT | gRPC port manager will bind to | 7001 |
MANAGER_GRPC_TIMEOUT | Timeout for gRPC requests | 60s |
MANAGER_LOG_LEVEL | Logging verbosity level | info |
Security and Attestation
| Variable | Description | Default Value |
|---|---|---|
MANAGER_GRPC_CLIENT_CERT | Client certificate path for gRPC communication | (empty) |
MANAGER_GRPC_CLIENT_KEY | Client private key path for gRPC communication | (empty) |
MANAGER_GRPC_SERVER_CA_CERTS | Server CA certificate(s) path for gRPC communication | (empty) |
MANAGER_ATTESTATION_POLICY_BINARY | Attestation policy binary file path | ../../build/attestation_policy |
MANAGER_IGVMMEASURE_BINARY | IGVM measure binary file path | ../../build/igvmmeasure |
MANAGER_PCR_VALUES | Expected PCR values file path | (empty) |
QEMU Virtual Machine Configuration
Basic VM Settings
| Variable | Description | Default Value |
|---|---|---|
MANAGER_QEMU_BIN_PATH | QEMU binary file path | qemu-system-x86_64 |
MANAGER_QEMU_USE_SUDO | Use sudo to run QEMU | false |
MANAGER_QEMU_MACHINE | QEMU machine type | q35 |
MANAGER_QEMU_CPU | CPU model for QEMU | EPYC |
MANAGER_QEMU_ENABLE_KVM | Enable KVM acceleration | true |
MANAGER_QEMU_NO_GRAPHIC | Disable graphical display | true |
MANAGER_QEMU_MONITOR | Monitor type | pty |
Memory and CPU Configuration
| Variable | Description | Default Value |
|---|---|---|
MANAGER_QEMU_MEMORY_SIZE | Total memory size (e.g., "2048M", "4G") | 2048M |
MANAGER_QEMU_MEMORY_SLOTS | Number of memory slots | 5 |
MANAGER_QEMU_MAX_MEMORY | Maximum memory size (e.g., "30G") | 30G |
MANAGER_QEMU_SMP_COUNT | Number of virtual CPUs | 4 |
MANAGER_QEMU_SMP_MAXCPUS | Maximum number of virtual CPUs | 64 |
MANAGER_QEMU_MEM_ID | Memory device ID | ram1 |
OVMF Firmware Configuration
| Variable | Description | Default Value |
|---|---|---|
MANAGER_QEMU_OVMF_CODE_FILE | OVMF code file path | /usr/share/OVMF/OVMF_CODE.fd |
MANAGER_QEMU_OVMF_VARS_FILE | OVMF variables file path | /usr/share/OVMF/OVMF_VARS.fd |
MANAGER_QEMU_OVMF_CODE_IF | OVMF code interface type | pflash |
MANAGER_QEMU_OVMF_CODE_FORMAT | OVMF code file format | raw |
MANAGER_QEMU_OVMF_CODE_UNIT | OVMF code unit number | 0 |
MANAGER_QEMU_OVMF_CODE_READONLY | OVMF code read-only setting | on |
MANAGER_QEMU_OVMF_VARS_IF | OVMF variables interface type | pflash |
MANAGER_QEMU_OVMF_VARS_FORMAT | OVMF variables file format | raw |
MANAGER_QEMU_OVMF_VARS_UNIT | OVMF variables unit number | 1 |
MANAGER_QEMU_OVMF_VERSION | EDKII version for OVMF | (empty) |
Network Configuration
| Variable | Description | Default Value |
|---|---|---|
MANAGER_QEMU_NETDEV_ID | Network device ID | vmnic |
MANAGER_QEMU_HOST_FWD_AGENT | Host port for agent communication | 7020 |
MANAGER_QEMU_GUEST_FWD_AGENT | Guest port for agent communication | 7002 |
MANAGER_QEMU_HOST_FWD_RANGE | Range of host ports to forward | 6100-6200 |
MANAGER_QEMU_VIRTIO_NET_PCI_DISABLE_LEGACY | Disable legacy PCI for virtio-net | on |
MANAGER_QEMU_VIRTIO_NET_PCI_IOMMU_PLATFORM | Enable IOMMU platform | true |
MANAGER_QEMU_VIRTIO_NET_PCI_ADDR | PCI address for virtio-net | 0x2 |
MANAGER_QEMU_VIRTIO_NET_PCI_ROMFILE | ROM image file path | (empty) |
Disk and Storage Configuration
| Variable | Description | Default Value |
|---|---|---|
MANAGER_QEMU_DISK_IMG_KERNEL_FILE | Kernel image file path | img/bzImage |
MANAGER_QEMU_DISK_IMG_ROOTFS_FILE | Root filesystem image file path | img/rootfs.cpio.gz |
File System Mounts
| Variable | Description | Default Value |
|---|---|---|
MANAGER_QEMU_CERTS_MOUNT | Host directory path for certificate mounting | (empty) |
MANAGER_QEMU_ENV_MOUNT | Host directory path for environment variable mounting | (empty) |
TEE-Specific Configuration
AMD SEV-SNP Settings
| Variable | Description | Default Value |
|---|---|---|
MANAGER_QEMU_ENABLE_SEV_SNP | Enable SEV-SNP | true |
MANAGER_QEMU_SEV_SNP_ID | SEV-SNP device ID | sev0 |
MANAGER_QEMU_SEV_SNP_CBITPOS | C-bit position in physical address | 51 |
MANAGER_QEMU_SEV_SNP_REDUCED_PHYS_BITS | Reduced physical address bits | 1 |
MANAGER_QEMU_ENABLE_HOST_DATA | Enable additional SEV-SNP host data | false |
MANAGER_QEMU_HOST_DATA | Additional SEV-SNP host data | (empty) |
Intel TDX Settings
| Variable | Description | Default Value |
|---|---|---|
MANAGER_QEMU_ENABLE_TDX | Enable TDX | false |
MANAGER_QEMU_TDX_ID | TDX device ID | tdx0 |
MANAGER_QEMU_QUOTE_GENERATION_PORT | Port for Quote Generation Service communication | 4050 |
MANAGER_QEMU_OVMF_FILE | Combined OVMF file for TDX | /usr/share/ovmf/OVMF.fd |
IGVM Configuration
| Variable | Description | Default Value |
|---|---|---|
MANAGER_QEMU_IGVM_ID | IGVM file ID | igvm0 |
MANAGER_QEMU_IGVM_FILE | IGVM file path | /root/coconut-qemu.igvm |
Observability Configuration
| Variable | Description | Default Value |
|---|---|---|
COCOS_JAEGER_URL | Jaeger tracing endpoint URL | http://localhost:4318 |
COCOS_JAEGER_TRACE_RATIO | Trace sampling ratio | 1.0 |
MANAGER_EOS_VERSION | EOS version for CVM booting | (empty) |
Configuration Examples
Basic Development Setup
export MANAGER_GRPC_HOST=localhost
export MANAGER_GRPC_PORT=7001
export MANAGER_LOG_LEVEL=debug
export MANAGER_QEMU_USE_SUDO=false
export MANAGER_QEMU_ENABLE_KVM=true
SEV-SNP Production Setup
export MANAGER_GRPC_HOST=<HOST_IP>
export MANAGER_GRPC_PORT=7001
export MANAGER_LOG_LEVEL=info
export MANAGER_QEMU_ENABLE_SEV_SNP=true
export MANAGER_QEMU_SEV_SNP_CBITPOS=51
export MANAGER_QEMU_BIN_PATH=/usr/bin/qemu-system-x86_64
export MANAGER_QEMU_IGVM_FILE=/path/to/your/igvm/file.igvm
export MANAGER_GRPC_CLIENT_CERT=/path/to/client.crt
export MANAGER_GRPC_CLIENT_KEY=/path/to/client.key
export MANAGER_GRPC_SERVER_CA_CERTS=/path/to/ca.crt
TDX Production Setup
export MANAGER_GRPC_HOST=<HOST_IP>
export MANAGER_GRPC_PORT=7001
export MANAGER_QEMU_ENABLE_SEV_SNP=false
export MANAGER_QEMU_ENABLE_TDX=true
export MANAGER_QEMU_CPU=host
export MANAGER_QEMU_OVMF_FILE=/path/to/tdx/OVMF.fd
export MANAGER_GRPC_CLIENT_CERT=/path/to/client.crt
export MANAGER_GRPC_CLIENT_KEY=/path/to/client.key
export MANAGER_GRPC_SERVER_CA_CERTS=/path/to/ca.crt
QEMU Configuration and Management
The Manager dynamically constructs QEMU command-line arguments based on environment variables and host capabilities.
Key QEMU Features
Virtualization Support
- KVM Acceleration: Enabled when
MANAGER_QEMU_ENABLE_KVM=true - Machine Types: Supports q35 (recommended) and other QEMU machine types
- CPU Models: Configurable CPU models (EPYC for SEV-SNP, host for TDX)
Memory Management
- Dynamic Allocation: Configurable base memory with hotplug capability
- Memory Slots: Support for memory expansion through additional slots
- NUMA: Automatic NUMA topology configuration for multi-CPU setups
Storage and Boot
- Kernel Loading: Direct kernel loading with bzImage
- InitRD: Root filesystem loading via initramfs
- OVMF Integration: UEFI firmware support for secure boot
Networking
- User-Mode Networking: Default networking with host-to-guest port forwarding
- VirtIO: High-performance network device with IOMMU support
- Port Management: Automatic port allocation from configurable ranges
Security
- TEE Integration: Native SEV-SNP and TDX support
- Attestation: Built-in support for hardware attestation
- Isolation: Process and memory isolation between CVMs
File System Mounts (9P)
The Manager uses Plan 9 Filesystem (9P) to securely transfer data between host and CVM:
Certificate Sharing
# Host directory for certificates, configured dynamically by manager
export MANAGER_QEMU_CERTS_MOUNT=/host/path/to/certs

# Mounted inside CVM as: /mnt/certs
Environment Variable Sharing
# Host directory for environment variables, configured dynamically by manager
export MANAGER_QEMU_ENV_MOUNT=/host/path/to/env

# Mounted inside CVM as: /mnt/env
TPM Integration
Virtual TPM (vTPM)
- Purpose: Provides tamper-resistant foundation for cryptographic operations
- Functions:
- Secure artifact storage
- System state measurement
- Attestation mechanism enablement
- Implementation: Uses COCONUT-SVSM for vTPM functionality
IGVM Files
An IGVM (Initial Guest Virtual Machine) file contains:
- VM launch information for different virtualization platforms
- Guest system setup commands
- Verification data for secure VM loading
- OVMF firmware and vTPM components (in Cocos implementation)
Deployment Guide
Compilation and Build
Build the Manager binary:
git clone https://github.com/ultravioletrs/cocos
cd cocos
make manager
Starting the CVMS Server
Before starting the Manager, ensure a CVMS server is running for testing:
Find Your IP Address
ip a
Look for your primary network interface and note the IP address (e.g., 192.168.1.100).
Start Test Server
HOST="192.168.1.41" go run ./test/cvms/main.go \
    -algo-path ./test/manual/algo/addition.py \
    -public-key-path ./public.pem \
    -attested-tls-bool false
Expected output:
{"time":"2025-06-25T14:52:58.693344502+02:00","level":"INFO","msg":"cvms_test_server service gRPC server listening at 192.168.1.41:7001 without TLS"}
Starting the Manager
Standalone Execution
# Basic startup
MANAGER_GRPC_HOST=localhost \
MANAGER_GRPC_PORT=7002 \
MANAGER_LOG_LEVEL=debug \
MANAGER_QEMU_USE_SUDO=false \
./build/cocos-manager
SEV-SNP Deployment
MANAGER_GRPC_HOST=localhost \
MANAGER_GRPC_PORT=7002 \
MANAGER_LOG_LEVEL=debug \
MANAGER_QEMU_ENABLE_SEV_SNP=true \
MANAGER_QEMU_SEV_SNP_CBITPOS=51 \
MANAGER_QEMU_BIN_PATH=/usr/bin/qemu-system-x86_64 \
MANAGER_QEMU_IGVM_FILE=/path/to/igvm/file.igvm \
./build/cocos-manager
TDX Deployment
MANAGER_GRPC_HOST=localhost \
MANAGER_GRPC_PORT=7002 \
MANAGER_LOG_LEVEL=debug \
MANAGER_QEMU_ENABLE_SEV_SNP=false \
MANAGER_QEMU_ENABLE_TDX=true \
MANAGER_QEMU_CPU=host \
MANAGER_QEMU_OVMF_FILE=/path/to/tdx/OVMF.fd \
./build/cocos-manager
SystemD Service Deployment
# Download and setup
go get github.com/ultravioletrs/cocos
cd $GOPATH/src/github.com/ultravioletrs/cocos

# Configure environment
nano cocos-manager.env

# Install and run
make install
make run
Operational Procedures
CVM Lifecycle Management
Creating a CVM
# Set manager URL
export MANAGER_GRPC_URL=localhost:7002

# Create CVM
./build/cocos-cli create-vm --log-level debug --server-url "localhost:7002"
Expected output:
🔗 Connected to manager using  without TLS
🔗 Creating a new virtual machine
✅ Virtual machine created successfully with id e71cdcf5-21c0-4e1d-9471-ac6b4389d5f3 and port 6100
Verifying CVM Launch
# Check QEMU processes
ps aux | grep qemu

# Expected output shows running QEMU instance with full command line
Managing CVM Assets
Upload algorithm:
export AGENT_GRPC_URL=localhost:6100
./build/cocos-cli algo ./test/manual/algo/addition.py ./private.pem -a python
Retrieve results:
./build/cocos-cli result ./private.pem
unzip results.zip -d results
cat results/results.txt
Removing a CVM
./build/cocos-cli remove-vm <cvm_id>
Expected output:
🔗 Connected to manager without TLS
🔗 Removing virtual machine
✅ Virtual machine removed successfully
Resource Management
CPU Allocation
Configure CPU resources based on computational requirements of your algorithms and the host's capabilities.
export MANAGER_QEMU_SMP_COUNT=8
export MANAGER_QEMU_SMP_MAXCPUS=16
export MANAGER_QEMU_CPU=EPYC  # or 'host' for TDX
Memory
Configure memory based on algorithm requirements. Over-provisioning can waste resources, while under-provisioning can lead to performance bottlenecks.
export MANAGER_QEMU_MEMORY_SIZE=4G
export MANAGER_QEMU_MAX_MEMORY=16G
export MANAGER_QEMU_MEMORY_SLOTS=8
Storage Configuration
Ensure HAL components are accessible
export MANAGER_QEMU_DISK_IMG_KERNEL_FILE=img/bzImage
export MANAGER_QEMU_DISK_IMG_ROOTFS_FILE=img/rootfs.cpio.gz
Network Management
Port Configuration
Configure port forwarding ranges
export MANAGER_QEMU_HOST_FWD_RANGE=6100-6200
Network Security
# Enable secure network features
export MANAGER_QEMU_VIRTIO_NET_PCI_IOMMU_PLATFORM=true
export MANAGER_QEMU_VIRTIO_NET_PCI_DISABLE_LEGACY=on
Monitoring and Logging
Manager Logging
Log Level Configuration
# Set appropriate log level for environment
export MANAGER_LOG_LEVEL=info      # Production
export MANAGER_LOG_LEVEL=debug     # Development/Troubleshooting
export MANAGER_LOG_LEVEL=error     # Minimal logging
Accessing Logs
Standalone Mode:
# Logs output to stdout/stderr
./build/cocos-manager 2>&1 | tee manager.log
SystemD Service:
# Check service status
sudo systemctl status cocos-manager

# View recent logs
journalctl -u cocos-manager -n 50

# Follow logs in real-time
journalctl -u cocos-manager -f

# Filter by log level
journalctl -u cocos-manager -p info
Distributed Tracing
Jaeger Integration
# Configure Jaeger tracing
export COCOS_JAEGER_URL=http://your-jaeger-instance:4318
export COCOS_JAEGER_TRACE_RATIO=0.1  # 10% sampling

# Full tracing for development
export COCOS_JAEGER_TRACE_RATIO=1.0  # 100% sampling
CVM Monitoring
Process Monitoring
# Check CVM processes
ps aux | grep qemu-system-x86_64

# Monitor resource usage
top -p $(pgrep qemu-system-x86_64)
Network Connectivity Testing
# Test agent connectivity
nc -zv localhost 6100  # Replace with actual port

# Check port forwarding
netstat -tuln | grep 6100
System Health Monitoring
Resource Monitoring
# CPU and memory usage
htop

# Disk usage
df -h

# Network interface statistics
iftop

# System load
uptime
Alerting and Notifications
Key Metrics to Monitor
- Manager service uptime and health
- CVM creation/deletion success rates
- Resource utilization (CPU, memory, disk)
- Network connectivity and port availability
- Attestation success/failure rates
- QEMU process health and zombie process detection
Error Handling and Recovery
Common Issues and Solutions
1. Defunct (Zombie) QEMU Processes
Symptoms:
ps aux | grep qemu-system-x86_64shows<defunct>processes after manager was shut down.- CVMs fail to start or respond
- Port conflicts during CVM creation
Diagnosis:
# Check for zombie processes
ps aux | grep defunct

# Check Manager logs for QEMU command
journalctl -u cocos-manager | grep "qemu"

# Test QEMU command manually
# Copy command from logs and run directly
/usr/bin/qemu-system-x86_64 [arguments from logs]
Recovery:
# Graceful termination
pkill -f qemu-system-x86_64

# Forceful termination if needed
kill -9 $(pgrep qemu-system-x86_64)

# Clean up temporary files
# WARNING: Verify the files to be deleted before running these commands.
# Use interactive mode to confirm each deletion.
rm -i /tmp/OVMF_VARS-*.fd
rm -i /tmp/cvm-*
Prevention:
- Verify OVMF file paths and permissions
- Ensure kernel and rootfs files are accessible
- Check environment variable configuration
- Monitor system resources
2. Attestation Failures
Symptoms:
- CVMs fail to launch with attestation errors
- Integrity verification failures
- TEE initialization errors
Diagnosis:
# Check hardware TEE support
dmesg | grep -i "sev\|tdx"

# Verify SEV-SNP capability
ls /dev/sev*

# Check TDX support
ls /dev/tdx*

# Verify IGVM file integrity
file $MANAGER_QEMU_IGVM_FILE
Recovery:
- Address underlying hardware or configuration issues.
- Rebuild or re-download IGVM/OVMF files if they are suspected to be corrupted.
# For SEV-SNP issues
export MANAGER_QEMU_SEV_SNP_CBITPOS=51
export MANAGER_QEMU_SEV_SNP_REDUCED_PHYS_BITS=1

# For TDX issues
export MANAGER_QEMU_CPU=host
export MANAGER_QEMU_ENABLE_KVM=true

# Rebuild IGVM if corrupted
# Download fresh IGVM file from releases
wget https://github.com/ultravioletrs/cocos/releases/latest/download/coconut-qemu.igvm
Prevention:
- Regularly verify TEE hardware functionality
- Keep IGVM files updated
- Monitor attestation success rates
- Validate PCR values against expected measurements
3. Network Connectivity Issues
Symptoms:
- Agent unreachable from host
- Port binding failures
- Connection timeouts
Diagnosis:
# Check port availability
netstat -tuln | grep 7020

# Test network connectivity
nc -zv localhost 6100

# Check firewall rules
sudo iptables -L
sudo ufw status

# Verify QEMU network configuration
ps aux | grep qemu | grep hostfwd
Recovery:
- Adjust firewall rules.
- Correct IP address or port configurations.
- Restart Manager and CVMs after network changes.
# Release conflicting ports
sudo fuser -k 7020/tcp

# Adjust port ranges
export MANAGER_QEMU_HOST_FWD_RANGE=6200-6300

# Configure firewall
sudo ufw allow 6100:6200/tcp

# Restart networking
sudo systemctl restart networking
Prevention:
- Reserve port ranges for Cocos
- Implement port conflict detection
- Monitor network interface statistics
- Use dynamic port allocation
4. Resource Exhaustion
Symptoms:
- CVM creation failures
- Poor performance
- Out-of-memory errors
- System instability
Diagnosis:
# Check memory usage
free -h
cat /proc/meminfo

# Check CPU usage
top
htop

# Check disk space
df -h

# Check swap usage
swapon --show
Recovery:
- Increase host machine resources (RAM, CPU cores).
- Reduce the number of concurrent CVMs.
- Optimize CVM memory and CPU allocations in the Manager's environment variables.
# Free memory
echo 3 > /proc/sys/vm/drop_caches

# Terminate resource-heavy CVMs
./build/cocos-cli remove-vm <heavy-cvm-id>
Usage
For more information about service capabilities and its usage, please check out the README documentation.